Introduction
When it comes to creating a space that’s both aesthetically pleasing and functional, few options match the appeal of epoxy garage floors. If you’re an environmentally-conscious architect or builder seeking durable, cost-effective, and eco-friendly flooring options, understanding epoxy and its benefits is your first step.
Epoxy floors stand out due to their durability, ease of maintenance, and versatility in design. Perfect for those who prioritize sustainability without sacrificing quality or appearance. These floors are resistant to spills, stains, and heavy wear—making them an ideal choice for garages that double as workshops or recreational spaces.
Here’s a quick glance at why epoxy flooring could be the right choice for your next project:
- Durability: Withstands heavy use without compromising on look or feel.
- Maintenance: Simple to clean, reducing the need for harsh chemicals.
- Aesthetic Appeal: Wide range of colors and finishes to align with any design vision.
- Environmentally Friendly: Less frequent replacements mean reduced waste.
- Cost-Effective: Long lifespan makes it a smart investment over time.
Choosing to install an epoxy floor means investing in a solution that is not only practical but also adds value to the property. It is a choice that benefits both the environment and your project’s bottom line.

We’ll dive into how to evaluate your garage floor, select the right epoxy coating, and understand the installation process to ensure you make the most informed decision for your sustainable building project. Whether you’re looking to do it yourself or hire a professional, this guide is here to help you every step of the way.
Evaluating Your Garage Floor
Before diving into epoxy garage floors, it’s crucial to take a close look at your garage floor’s current state. This step is all about understanding what you’re working with and what needs to be done to ensure a successful epoxy application. Let’s break it down:
Current Condition
Start by examining the surface for any cracks, oil stains, or areas of moisture. These are common issues that can affect the adhesion and overall quality of the epoxy coating. It’s not just about how the floor looks but about ensuring it’s in the right condition to bond with the epoxy. Every stain tells a story, and while some might recall fond memories, they could spell trouble for your epoxy application.
Size
Knowing the size of your garage floor is more than a matter of square footage—it’s about planning and precision. The size of your garage will determine how much epoxy you’ll need, and it plays a crucial role in estimating the cost and duration of the project. Whether you have a one-car garage or a space large enough for three, understanding the size helps in tailoring the project to your specific needs.
Preparation Needs
Preparation is arguably the most critical step in the epoxy installation process. This includes cleaning the floor thoroughly, repairing any cracks or damage, and ensuring the floor is completely dry before application. The degree of preparation needed can vary significantly depending on the current condition of your garage floor. For example, a floor with multiple cracks and stains will require more extensive prep work compared to a relatively new and clean surface.
Preparing for Success
Taking the time to evaluate your garage floor thoroughly will set the foundation for a successful epoxy application. It’s not just about the aesthetic appeal but ensuring longevity and durability. Whether you decide to tackle the project yourself or hire professionals, understanding the current condition, size, and preparation needs of your garage floor is essential. This initial evaluation will guide you in selecting the right epoxy product and ensure that your investment enhances the functionality and value of your garage.
Keep in mind that the right preparation and product selection are crucial steps towards achieving that perfect epoxy garage floor. Next, we’ll delve into choosing the right epoxy coating for your garage, considering factors such as types of epoxy, water-based vs. 100% solids, and polyurea alternatives.
Choosing the Right Epoxy Coating
When it comes to transforming your garage with an epoxy coating, selecting the right type is key to ensuring durability, aesthetics, and longevity. Let’s break down the options, helping you make an informed decision for your space.
Types of Epoxy
Epoxy coatings come in various forms, each suited to different needs and preferences. Here’s a simple breakdown:
- Standard Epoxy: This is your go-to for a balance of durability and cost-effectiveness. It’s robust against wear and tear, making it a solid choice for residential garages.
- High-Performance Epoxy: Designed for tougher environments. If your garage doubles as a workshop or you have heavy vehicles, this might be the right pick.
Water-based vs. 100% Solids
The main difference here is in the composition and the outcome they deliver:
- Water-based Epoxy: Easier to apply and more environmentally friendly due to its lower VOC content. It’s thinner, which means you might need multiple coats, but it’s a good option if you’re looking for something straightforward and slightly less durable.
- 100% Solids Epoxy: This is the heavy-duty option. With no water or solvents evaporating during the curing process, it leaves behind a thicker, more durable layer. It’s trickier to apply, so might be best left to the pros, but it offers superior protection and longevity.
Polyurea Alternatives
Polyurea is a newer technology in the floor coating world. It’s known for its rapid curing time and UV resistance, making it a great choice if your garage gets a lot of sunlight. It’s also more flexible, which means it can handle temperature fluctuations better than traditional epoxy. However, it can be more expensive and might not be necessary for every garage.
Making the Choice
When choosing the right epoxy coating, consider:
- Usage: How you use your garage should guide your decision. Heavy machinery and vehicles demand a tougher coating like 100% solids epoxy or polyurea.
- Climate: Temperature changes and UV exposure can affect the longevity of your floor. Polyurea might be the best bet in these cases.
- Budget: Water-based epoxies are more cost-effective and might be sufficient for garages with light to moderate use.
- Professional Help: Given the complexities involved in choosing and applying the right epoxy, consulting with a professional can save you time, money, and headaches. Companies like Topcoat Services offer expert guidance tailored to your specific needs.
The goal is to enhance your garage’s functionality and appearance while ensuring the coating lasts for years to come. Taking the time to choose the right epoxy coating will pay off in the long run, providing a durable, easy-to-clean surface that stands up to daily use.
As we’ve explored the various options, the next step is preparing for the installation. Proper preparation is crucial for a successful application, ensuring your chosen epoxy adheres well and looks great.
Preparing for Installation
Before diving into the transformation of your garage with epoxy, there’s a bit of housekeeping to do. Let’s break it down into three main steps: emptying the garage, surface cleaning, and crack repair. These steps are essential to make sure your new epoxy garage floors look stunning and last for years.
Emptying the Garage
First things first, you need to clear the stage. This means taking everything out of your garage. Yes, everything. It might seem like a daunting task, but it’s a necessary one. You’re not just making room for the work to be done; you’re also protecting your belongings from dust, debris, and potential spills. Think of it as a good opportunity to declutter and maybe even donate items you no longer use.
Surface Cleaning
Next up is getting the floor spotlessly clean. This isn’t your regular sweep-up. You’ll need to remove oil stains, grease, and any other residue that could interfere with the epoxy’s ability to bond with the concrete. Professional services like Topcoat Services use high-grade cleaning agents and equipment to ensure the floor is pristine. If you’re tackling this yourself, consider renting or purchasing the necessary cleaning equipment. The cleaner the floor, the better the epoxy will adhere.
Crack Repair
Last but not least, inspect your garage floor for cracks and chips. These imperfections need to be addressed before the epoxy application. Not only do they affect the final look, but they can also compromise the integrity of the epoxy coating. Use quality fillers designed for concrete to patch up any damage. This step is crucial for a smooth finish and for preventing future issues with your new floor.
By meticulously preparing your garage floor for epoxy, you’re setting the stage for a successful and durable application. Skipping these steps or doing a half-hearted job can lead to unsatisfactory results and potentially more expenses down the line. So, take your time, do it right, and look forward to enjoying your new, high-performance epoxy garage floors.
Let’s delve into the exciting part – the installation process itself. Whether you’re considering a DIY project or planning to hire professionals like Topcoat Services, understanding the application methods and what’s involved will help you make informed decisions and ensure a stunning outcome.

Industrial
Installation Process
When it comes to installing epoxy garage floors, you have two main routes: rolling up your sleeves to do it yourself (DIY) or hiring professionals. Let’s break down each option to see what might work best for you.
DIY vs. Hiring a Pro
DIY Route:
- Pros: Going the DIY route can be more cost-effective. It’s a rewarding project if you’re handy and have the time to dedicate to getting it right. You have complete control over the timeline and the process.
- Cons: Without the right experience, you might face challenges such as uneven application or improper mixing of the epoxy components. Mistakes can be costly and time-consuming to fix.
Hiring Professionals:
- Pros: Professionals bring expertise and experience. They know how to prepare the surface, mix the epoxy correctly, and apply it for a smooth, durable finish. Hiring pros like Topcoat Services can save you time and ensure the job is done right the first time.
- Cons: The upfront cost is higher than doing it yourself. You’ll need to schedule the installation around the contractor’s availability.
Application Methods
Whether you decide to DIY or hire a pro, understanding the application methods used is essential. Here’s a brief overview:
- Surface Preparation: This is the most critical step. The garage floor must be clean, dry, and free of any grease, oil, or debris. Cracks should be filled, and the surface may need to be ground or etched to ensure the epoxy adheres well.
- Mixing Epoxy: Epoxy comes in two parts: a resin and a hardener. These need to be mixed thoroughly at the correct ratio. Improper mixing can lead to a floor that doesn’t set correctly.
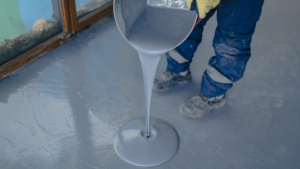
- Applying Epoxy: The mixed epoxy is then applied to the floor. This can be done using rollers, squeegees, or brushes, depending on the product and desired finish. It’s important to work quickly but carefully, as epoxy has a limited working time once mixed.
- Curing Time: After application, the epoxy needs time to cure. This can take anywhere from 24 hours to several days, during which you should avoid walking on or using the garage.
Choosing What’s Right for You
Deciding between DIY and hiring a professional comes down to a few key factors:
- Skill Level: If you’re comfortable with home improvement projects and willing to learn the nuances of working with epoxy, DIY might be a good fit. If not, or if you’re looking for a flawless finish, consider hiring professionals.
- Time and Money: Weigh the cost savings of DIY against the time investment required. Professionals can often complete the job more quickly and with better results.
- Quality and Durability: Professionals guarantee their work, providing peace of mind that your investment will last. DIY projects can be successful but come with a higher risk of issues that could affect the floor’s longevity.
In conclusion, installing epoxy garage floors is a significant upgrade that requires careful consideration. Whether you choose to DIY or hire professionals like Topcoat Services, understanding the process and what’s involved is key to ensuring a successful outcome. The beauty and durability of your garage floor depend on the quality of the installation.
Maintenance and Longevity
Epoxy garage floors are not just about making your garage look fantastic; they’re about creating a durable, long-lasting surface. But like anything valuable, they need a bit of care to keep them in top shape. Let’s dive into how you can maintain your epoxy floor and ensure its longevity.
Cleaning Tips
Keeping your epoxy garage floor clean is straightforward. Here’s how:
- Daily Dust Mopping: Use a soft dust mop or a microfiber pad to pick up daily dirt and debris. This prevents scratches and keeps the surface looking shiny.
- Spot Cleaning: Spills and stains should be cleaned immediately using a soft cloth and a mild cleaner. Avoid harsh chemicals that can damage the epoxy coating.
- Deep Cleaning: For a deeper clean, use a foam mop and a gentle, pH-neutral cleaner mixed with warm water. Rinse well to avoid leaving any residue.
Maintenance Schedule
To keep your epoxy floor in its best condition, follow this simple schedule:
- Weekly: Perform a thorough cleaning using a foam mop and a pH-neutral cleaner.
- Monthly: Check for any signs of wear or peeling. Addressing these early can prevent bigger issues down the line.
- Annually: Consider a professional inspection to ensure the epoxy coating is holding up well and to identify any potential problems.
Reapplication
Even the most robust epoxy floors will eventually show signs of wear. The good news is, you don’t need to start from scratch. Here’s when to consider reapplication:
- Top Coat Wear: If the topcoat starts to thin from heavy use, applying a new topcoat can refresh the surface and extend its life.
- Significant Damage: In cases of significant damage or peeling, a professional might recommend sanding down the top layer and reapplying the epoxy.
Pro Tip: Always consult with a professional like Topcoat Services before attempting any reapplication yourself. They can provide the best advice on whether a simple topcoat refresh is enough or if a more thorough reapplication is needed.
By following these simple maintenance and care tips, your epoxy garage floor can remain a functional and beautiful part of your home for many years. The key to longevity is regular cleaning, timely maintenance, and knowing when to call in the pros for a touch-up. This way, you not only protect your investment but also enjoy a high-performance garage floor that looks as good as new.
Moving on, let’s address some of the most Frequently Asked Questions about Epoxy Garage Floors to help you make informed decisions about your flooring.

Frequently Asked Questions about Epoxy Garage Floors
When considering epoxy garage floors, several questions often come to mind. Let’s dive into some of the most common queries to ensure you have all the information you need.
Is it worth it to epoxy your garage floor?
Absolutely! Applying an epoxy coating to your garage floor has numerous benefits. It protects the floor from stains, cracks, and wear and tear, making it more durable over time. Epoxy floors are also easier to clean than bare concrete, requiring just a simple sweep or mop to remove dust and spills. Aesthetically, they can transform a dull garage into a bright, inviting space. Considering these advantages, the investment is often seen as highly worthwhile.
How long does an epoxy garage floor last?
The lifespan of an epoxy garage floor can vary based on several factors, including the quality of the installation, the type of epoxy used, and how well the floor is maintained. Generally, a professionally installed epoxy floor can last 10 to 20 years. To maximize the longevity of your floor, it’s crucial to follow a regular maintenance schedule and address any spills or damages promptly.
How much does it cost to epoxy a garage floor?
The cost to epoxy a garage floor can range widely depending on the size of your garage, the type of epoxy you choose (water-based vs. 100% solids), and whether you decide to DIY or hire a professional. On average, homeowners might spend anywhere from $750 to $3,000 for a professional installation. While DIY kits are available at a lower upfront cost, hiring a professional ensures a high-quality finish and durability that can save money in the long run. The cost can be seen as an investment into your property’s value and the functionality of your garage space.
By addressing these FAQs, we hope you now have a clearer understanding of epoxy garage floors and can make an informed decision on whether this flooring option is right for you. Consulting with a professional, like Topcoat Services, can provide personalized advice tailored to your specific garage and needs.
Conclusion
After diving deep into epoxy garage floors, it’s clear that this flooring option offers a blend of durability, aesthetics, and value that’s hard to beat. Whether you’re looking to transform your garage into a sleek workshop, a functional storage space, or simply want to boost your home’s value, epoxy flooring stands out as a smart choice.
Long-term benefits of choosing epoxy for your garage floor include:
- Durability: Epoxy floors resist stains, cracks, and chips, standing up to daily wear and tear with grace.
- Easy Maintenance: Keeping your epoxy floor clean is a breeze, requiring only regular sweeping and occasional mopping.
- Aesthetics: With a variety of colors and finishes available, epoxy can turn a drab garage into a stylish extension of your home.
- Safety: Epoxy floors can be slip-resistant, making your garage a safer place to work and move around.
But, as we’ve seen, achieving these benefits hinges on the quality of the installation. This is where contacting a professional makes all the difference. A reputable installer, like Topcoat Services, not only ensures that your floor is prepared correctly but also applies the epoxy evenly and efficiently, guaranteeing a finish that lasts.
Choosing Topcoat Services for your epoxy garage floor installation means choosing peace of mind. With a track record of satisfied customers and a deep understanding of epoxy’s nuances, we’re equipped to handle your project from start to finish. We pride ourselves on delivering not just a service, but a transformation that enhances your home and lifestyle.
If you’re ready to take the next step towards a durable, beautiful garage floor, we invite you to explore our residential flooring solutions. Let’s turn your vision into reality, creating a space that’s as functional as it is inviting. Contact us today to discuss your project and discover how Topcoat Services can make your epoxy flooring project a seamless success.
With over 12 years of work experience in various fields, I am a versatile and adaptable manager at Topcoat Services USA LLC, a leading provider of polished concrete and epoxy flooring solutions. I have a strong background in logistics, having served as a logistics specialist in the United States Marine Corps for four and a half years. I also have a passion for culinary arts, and I worked as a sous chef at Crafted Hospitality, a renowned restaurant group, for two and a half years. At Topcoat Services USA LLC, I leverage my skills in epoxy flooring, project estimation, and logistics to deliver high-quality and cost-effective projects for our clients. I enjoy working with a diverse and collaborative team of professionals, and I am always eager to learn new techniques and technologies in the flooring industry. My mission is to create durable, beautiful, and sustainable floors that meet the needs and expectations of our customers.